Excavate the subgrade 20-30 cm deep and level it. For the fabric layer, use geotextile at ≥200 g/m², overlap seams by 30 cm, and secure them in place. For the fill, place crushed stone in 15 cm lifts. Never allow vehicles to drive directly over the fabric. Compact mechanically and maintain a 2% drainage slope.
Excavation and Grading
Excavation
Before starting, call your local utility marking hotline. Wait a full 48 hours, and painted lines will appear across the lawn. Red marks indicate a high-voltage power cable buried 18 inches deep, and yellow marks show a natural gas line at 24 inches. Keep the excavator tracks at least 3 feet away from both the red and yellow lines.
Rent a 3,500-pound diesel mini excavator from an equipment rental yard. Fit it with an 18-inch narrow bucket for tighter work. Push the control lever down, and the metal teeth cut into the ground, peeling up the sod and topsoil in one piece. Dark topsoil full of roots swells after heavy rain and shrinks again under direct sun.
Pile all excavated spoil in an open area nearby. Hire a 10-cubic-yard dump truck and park it at the curb. Each excavator bucket load holds about half a cubic yard of spoil. Swing and dump it into the truck bed. A full load weighs around 15,000 pounds and gets hauled 5 miles out of town to the landfill.
Step down into the excavation and push a wooden grade stick marked in feet into the bottom. Dig down to the full target depth of 12 inches. If you hit yellow clay, excavate another 3 to 4 inches. Sticky mud will cake onto the inside of the bucket. Get out, grab a D-handle square shovel, and scrape off the 2-inch layer of packed muck stuck to the steel.
Old trees send roots far beyond the reach of their canopy. If the bucket accidentally cuts a large root more than 1.5 inches in diameter, coat the cut end with black tree wound dressing using a large paintbrush. Left buried in the soil, thick roots can rot hollow in three to five years.
Once a hollow root decays, the weight above can crush it. The soil then collapses into a sinkhole about 2 inches wide. Grab a can of inverted fluorescent orange spray paint. Measure 8 inches beyond the planned driveway edge and spray a solid line along the ground.
That orange line outlines a work zone of about 1,500 square feet. While working, the excavator’s black rubber tracks should stay outside the orange boundary. Drive the heavy machine back and forth over the freshly exposed subsoil four or five times.
Watch the soil surface closely right after the tracks pass. If a section ripples like water and moves up and down by more than 1 inch, back the excavator up, lower the large bucket, and dig out the entire soft, unstable area.
Refill the fully excavated hole with the following dry material:
- 3/4-inch crushed stone
- Mixed with 20% dry stone dust
- Placed in lifts no thicker than 3 inches
- Flatten all sharp stone points with the back of a shovel
Grab a handful of yellow subsoil from the excavation bottom and squeeze it into a fist. If it crumbles into powder onto your boots when you open your hand, the moisture content is below 5%. Pull out a 50-foot rubber hose, attach a metal spray head, and apply 0.5 gallon of tap water per square yard.
If water squeezes out between your fingers when you press the soil, moisture content is above 15%. Shut down all machines and let the area bake in full sun for two full days. Then go to the hardware store and buy a roll of bright yellow nylon mason’s line. Cut dozens of 24-inch pointed wooden stakes with a table saw.
Walk along the excavated edge and stop every 10 feet. Use a 3-pound sledgehammer to drive each stake 8 inches into the ground. Pull the yellow line tight between all the stakes. Hang a small line level with hooks from the center of the string.
Watch the bubble until it sits exactly between the two black marks. Measure from the driveway centerline and mark it with white chalk. The soil at both outer edges must sit 2.4 inches lower than the centerline. Then bring in a bulldozer to continue.
Set the bulldozer blade to a 15-degree tilt. As the steel cutting edge scrapes across the yellow soil, it pushes material from the center toward both sides, creating a crowned profile. For tight inside corners the machine cannot reach, switch to hand tools:
- 36-inch-wide aluminum grading rake
- Wide bow rake with 14 hardened steel tines
- 8-pound all-steel hand tamper with a flat base
After grading, the surface will still be covered with loose clods and shallow track marks left by the bulldozer. Rent a 4,000-pound diesel reversible plate compactor. Pull the starter rope hard and the steel base plate will deliver about 4,500 impacts per minute. The machine moves forward at roughly 4 inches per second.
The heavy vibration forces loose soil into the voids between the stone. Grip the steel handles tightly and run the machine slowly down the far left side of the driveway. At the end of the pass, turn it around and come back. Shift the second pass slightly so the path overlaps.
Leveling and Drainage Slope
Once the digging machine leaves, the bottom of the excavation looks like crumpled newspaper, with dips and pockets everywhere. After a rain, water will pour straight into any shallow low spot. On a strip of dirt 60 feet long and 15 feet wide, you need to create a drainage slope that is almost invisible to the eye.
Rent a rotary laser level with a heavy tripod. Spread the three aluminum legs wide and drive them firmly into the hard soil in front of the garage door. Lock the unit at exactly 48 inches above ground. Press the red button, and the motor spins at 600 rpm, projecting a full horizontal red laser plane.
Take an 8-foot aluminum grade rod marked in 1/16-inch increments and clamp the laser receiver onto it. Walk 10 feet out from the garage door and hold the rod straight down on the soil. Slide the receiver up and down until it gives a continuous sharp beep, indicating correct elevation.
The height at the joint of the garage slab is treated as zero. From that point, for every 1 foot you move toward the street, the subgrade must drop by exactly 1/4 inch. By the time you reach the far end 60 feet away, the soil at the rod base should be a full 15 inches lower than the soil at the garage.
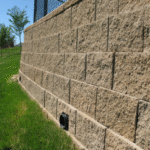
The left side of the yard runs along the neighbor’s low brick wall, and the right side borders your Bermuda grass lawn. Water must never collect in puddles at the base of that wall. The driveway subgrade needs a profile that is higher in the middle and lower at both edges—a shape contractors call a crown.
Measure 5 feet out from the white centerline to both the left and right. The elevation at the center stake should be exactly 1.2 inches higher than either edge. That gives you the required cross slope. This kind of fine work depends on a few specific tools:
- 48-inch-wide magnesium-aluminum drag screed
- 4-foot wooden level with bubble vial
- 6,500-pound tracked skid steer
- Plumb bob with an 8-ounce brass weight
Fit the skid steer with a 72-inch smooth-edge bucket. Climb into the ROPS cab and push both black control levers forward. Tilt the front cutting edge down to a 5-degree angle and shave the soil a little at a time.
Like an old straight razor, the sharp steel edge slices off any hump rising above grade. In seconds, the bucket fills with half a cubic yard of dry loose soil. Drive over and dump it into a low spot where the laser receiver stayed silent. After twenty or more forward-and-back cycles, the major high and low spots are gone.
Up close, the rough-graded surface is still covered in 3-inch-deep rubber track marks from the skid steer. Pick up the 48-inch magnesium-aluminum drag screed. Thread a 10-foot length of heavy rope through the holes at both ends and sling it over your shoulders.
Walk backward one step at a time while dragging it forward. The hard alloy edge scrapes tightly across the soil surface. Clods break down into gravel-sized crumbs and fill the ruts left by the tracks. If you hit a hard clump the size of a fist, stop and crush it under your work boot.
Judging grade by eye alone is asking for trouble. Take out a 4-foot wooden level and lay it along the drainage direction over the newly cut slope. Under the lower end, place a square wood block exactly 3/8 inch thick.
The bubble inside the glass vial should settle perfectly between the black lines. Mark an X on the nearby stake with a black marker. In corners or narrow areas where the large screed will not fit, all the fine adjustment has to be done with a 14-tine steel rake:
- Use the teeth side down to loosen hard clods
- Flip it over and use the flat back to scrape away excess soil
- Switch to an 8-pound hand tamper to compact weak corners
- Use a watering can to check how quickly water infiltrates the soil
One of the worst surprises during finish grading is an abandoned trench or buried pipe channel underneath. As the drag screed passes over it, the surface suddenly drops by more than half an inch. Stop immediately and cut open the surface with a square shovel. Underneath is a hidden void about the size of a watermelon.
Dump 20 pounds of coarse yellow sand into the hole, then add half a bucket of crushed stone. Grab a 3-foot-long 4×4 timber and ram it down hard twenty times. Once the repair area feels dense and solid, cover it again with dry soil and level the surface.
By the time the full 60-foot dirt driveway has been graded, the sun is nearly down. Pull over a hose for a water test. Fill a full 5-gallon bucket with cool tap water. Walk to the center of the driveway and dump the entire bucket at once onto the finished surface.
The water should not sit there even for a second. It should split into two streams, run neatly toward both sides along the cross slope, and then continue down the long grade toward the street. After 15 seconds, only a thin dark damp stain should remain on the soil.
Roll Out the Geotextile Fabric
Unroll with the Flow
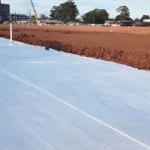
Buy a standard roll of black woven geotextile, 432 feet long and 12.5 feet wide, with a total weight of more than 250 pounds. Dragging it directly across mud will abrade the outer fibers. Slide a 1.5-inch-diameter steel pipe, 14 feet long, through the cardboard core. Two people should lift the roll by the pipe ends and keep it 4 inches off the ground while placing it at the junction between the driveway and the street.
Roll it forward at a steady pace of about 1 foot per second. The direction of the fabric must match the future direction of wheel travel exactly. When a 4,000-pound pickup brakes on a slope, the tires can generate about 1,500 pounds of forward shear force. The longitudinal fibers in the fabric are designed to resist that load, with each strand able to handle about 315 pounds of tension.
If the fabric goes down crooked, the load path is off and the sheet becomes easier to tear. The driveway excavation is 10 feet wide, so a 12.5-foot roll fits well, leaving 1.25 feet extra on each side to curl slightly up the trench walls. If one edge is uneven, it is better to let the excess fabric lap onto the lawn than to force the whole roll off line.
- Wear rubber-coated work gloves
- Carry a hook-blade utility knife in your pocket
- Stake the starting edge every 12 inches
- Check the soil surface by hand; stop if moisture exceeds 20%
The person pushing the roll must keep eyes fixed on the ground ahead. If there is a rut or depression deeper than 2 inches, stop immediately. Fill it with 3/4-inch crushed stone and compact it before continuing. If the fabric spans a hollow unsupported, tens of tons of aggregate dropped onto it later will snap the fibers on the spot.
Every 20 feet, stop and pause the work. One person stands on the already-laid fabric to hold it in place. The other grabs the leading edge and pulls hard toward the far end of the driveway with 20 to 30 pounds of force. In sunlight, the black woven grid should look perfectly straight, with no waviness at all.
Even a wrinkle just 1 inch wide can create uneven load transfer once the stone goes down. Within two or three years, that spot can turn into a 3-inch-deep depression that holds water. Wind makes this work much harder. If 50 feet of 12.5-foot-wide fabric is exposed in a 10 mph wind, uplift can approach 900 pounds.
- Keep the fabric no more than 6 inches above the ground
- After tensioning, place 10-pound solid bricks on all four corners
- Stop work if afternoon wind reaches 15 mph
- Drive three steel pins every 10 feet as you advance
When you reach a bend in the driveway, do not try to force the fabric around it. This type of geotextile has less than 15% elongation and almost no stretch. Pulling it around a curve will leave one side too tight and the other side packed with dead wrinkles. Stop and pull out the utility knife fitted with a hook blade.
Cut cleanly across the sheet along the transverse fiber line. Pull the already-laid straight section tight and pin it firmly. Then lift the remaining half roll by hand, rotate it in the air to line up with the new direction, and set it back down. Think of it as forming a curved driveway by joining several straight pieces.
The new section should overlap back onto the previous sheet, and the overlap area must never be less than 18 inches. On the outside of the curve, the overlap triangle may exceed 24 inches. Use 6-inch galvanized steel pins to drive through both layers and lock them together. Do not try to save material by trimming off those extra corners.
- For curved sections, cut 3 to 4 pieces about 15 feet long
- No exposed yellow soil should be visible at any seam
- Two overlapping layers will total about 0.08 inch thick
- Use No. 11 gauge pins through both layers into firm soil
Stand back and look down the installed black fabric. The interwoven plastic slit-film strands should form neat square openings. If any area shows the mesh stretched into long diamonds, that section has taken more than 40 pounds of pull and the strands inside are already damaged. Pull a few nearby pins, relax the tension, and flatten it back out.
Overlap Rules
The black woven fabric you buy at a building supply yard usually comes no wider than 15 feet. A typical double driveway wide enough for two full-size pickups will easily exceed 22 feet. Once the first sheet is laid along one side, you will still have about 7 feet of exposed soil left beside it.
If you simply place the second sheet edge to edge against the first, it may look neat, but it will fail in service. When a fully loaded aggregate truck drives over it, more than 20 tons of pressure will force the stone outward. If the fabric edges separate by even half an inch, wet subgrade mud will pump up through the gap.
Even if the exposed seam is only as wide as a ballpoint pen barrel, within three winters that joint will almost certainly settle into a rut about 10 feet long.
When laying the second sheet, pull it back so it overlaps the first securely. The minimum required overlap is 18 inches—about the length of a long-handled shovel blade plus part of the handle. Measure it with a 25-foot steel tape. Do not guess by eye.
On soft ground where your footprint sinks more than 1 inch, an 18-inch overlap is not enough. In design terms, that kind of weak subgrade is equivalent to a CBR below 3. In that case, the overlap should be doubled to 36 inches.
- Carry two thick white chalk sticks in your pocket
- Mark the lower sheet every 5 feet
- On soft mud, the overlap zone can consume nearly 20% of a full roll
- You should not be able to feel a step between layers at the seam by hand
If the driveway has any slope, the order in which you lay the sheets matters. Use a 4-foot aluminum level on the ground to check it. Even with as little as a 2% slope, the downhill sheet must be laid first. Then the uphill sheet should lap over the downhill sheet in the direction of flow.
It works exactly like roof shingles on an old house: the upper piece overlaps the lower piece so driving rain sheds over the surface instead of leaking underneath.
In a heavy storm, muddy runoff will rush down a driveway sloped at 5 degrees. If the uphill sheet overlaps the downhill sheet, the water will glide over the seam. If the overlap is reversed, water will be forced directly into the joint.
Secure the Fabric
A newly rolled-out black woven fabric can easily cover a few hundred square feet. Spread across yellow clay, it looks like a giant sail that has not quite caught the wind yet. Let the breeze hit 12 mph, and air starts forcing its way under the fabric edge. Within seconds, the whole sheet can balloon 3 feet off the ground.
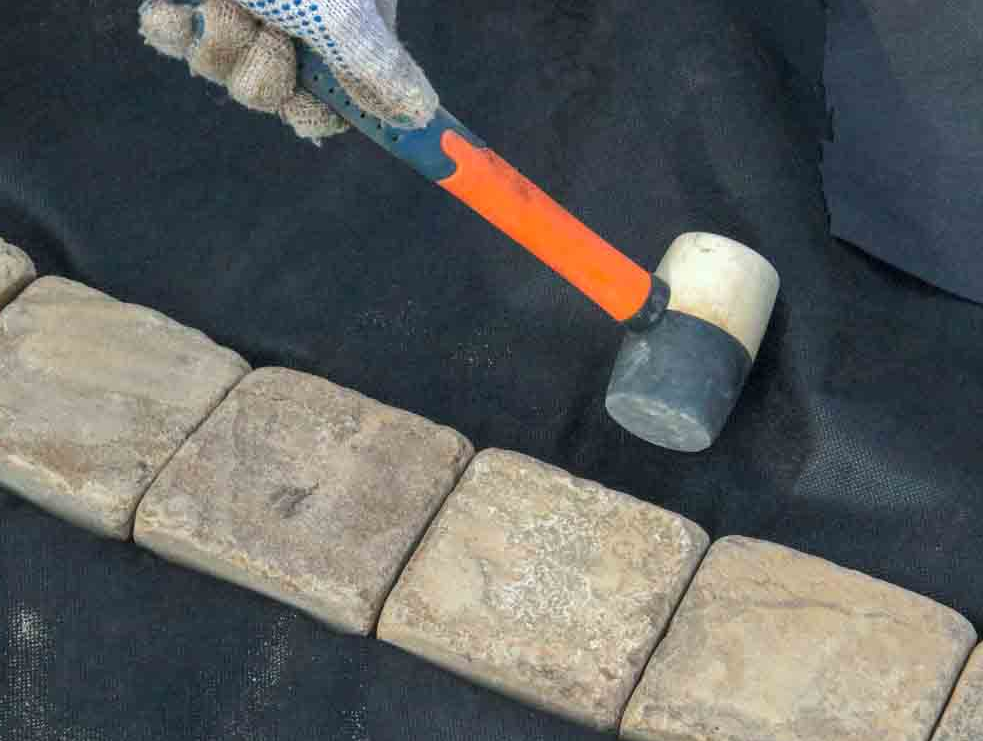
The dozens of pounds of geotextile flap up and down against the soil. That carefully aligned 18-inch overlap you just set is instantly pulled out of place. Go to the tool shed and grab a black rubber mallet weighing more than 16 ounces. Throw those flimsy yellow plastic tent stakes aside.
Bring over a box of No. 11 galvanized U-shaped steel staples. Each one has two pointed legs 6 inches long and a top bridge exactly 1 inch wide. In dry, dense yellow clay, one properly driven 6-inch staple can resist about 50 pounds of pullout force.
Walk the outside edge of the driveway with a 25-foot steel tape in hand. Every 36 inches, drive one staple into the soil. Crouch down, hold the staple by the top bridge between thumb and forefinger, and place the points 1 inch in from the edge of the black fabric.
With the rubber mallet in your right hand, start with two light taps. Let the two sharp legs just pierce the 0.04-inch-thick plastic slit-film surface. Then raise the mallet about 8 inches above the staple and continue driving it.
- Use controlled blows, not the kind of force you would use on rock
- Stop when the top of the U is about 0.5 inch above the fabric
- Then step on it with a heavy work boot to seat it fully
- Check by hand that the staple is gripping the fabric strands tightly
The ground often hides stones the size of dove eggs. Sometimes one staple leg gets halfway in and hits a rock, twisting the entire pin to a 45-degree angle. If you keep hammering, the galvanized coating will scrape off against the stone. In less than two months, that staple can rust through underground.
Grab a 10-inch locking pliers from the toolbox. Clamp the twisted staple, pull it out completely, and throw it away. Shift 2 inches left or right, avoid the buried stone, and drive in a fresh staple.
The seam where two sheets overlap catches the most wind. That is always the area where the upper sheet wants to lift first.
Along the seam between two sheets, spacing has to be tighter. Reduce the distance between staples to 18 inches. On downhill sections, angle your wrist and drive the staple at about 75 degrees to the ground. That way, rain running downslope will not enter the tiny hole made by the pin.
In drought-hardened clay cracked open after months without rain, even a 15 mph wind can be a problem. The soil becomes loose like flour, and 6-inch staples will not hold. Switch to 8-inch barbed staples instead.
The table below shows the hard rules for pinning fabric over soil:
| Actual Soil Condition | Estimated Wind Speed | U-Pin Length | Edge Staple Spacing | Overlap Seam Staple Spacing |
|---|---|---|---|---|
| Dry hard soil, no footprint when stepped on | Below 10 mph | 6-inch standard | 36 inches | 24 inches |
| Slightly soft, half-inch footprint | 10 to 15 mph | 8-inch extended | 24 inches | 18 inches |
| Sticky wet mud after rain | Above 15 mph | 8-inch barbed | 18 inches | 12 inches |
At the edges, the black fabric should curl about 6 inches up the yellow soil sidewalls, creating a crisp 90-degree bend. Place a staple at that bend and drive it at a 45-degree angle into the sidewall.
Drive one like this every 48 inches. That effectively hangs the fabric on both soil walls, turning it into a black basin that keeps soil from escaping. Occasionally you may see small bubbles in the fabric surface about half an inch high. Never kick or stomp them flat with muddy boots.
Walk to the center of the bulge and press it down firmly with your palm. Then drive a 6-inch staple right through the center. The loose fabric tightens into the soil under the pin, and the bubble disappears immediately.
Lay the Base Gravel
Choose the Right Stone
When you go to the quarry, ask for #3 or #4 crushed stone. Individual stones should range from 38 mm to 64 mm. Quarry-crushed rock has very sharp, angular edges.
When a 2-ton pickup drives over it, the angular stones interlock and resist movement. River rock is too smooth; once a tire rolls over it, the stones scatter sideways. A good surface can quickly turn into ruts 5 to 10 cm deep.
If the layer consists entirely of 60 mm rock, voids can reach 40%. Heavy rain can wash out support from underneath. When ordering, ask the quarry to mix in about 30% fine stone dust with the coarse aggregate.
A practical blend looks like this:
- 45% large coarse stone
- 25% medium-size pieces about the size of a fingernail
- 15% coarse sand-sized particles
- 15% flour-like fines
Limestone contains nearly 50% calcium carbonate. Once wetted and allowed to dry naturally over 7 to 14 days, the lower stone layer can bind up like a weak concrete slab and become very firm.
Granite has a Mohs hardness of 6 to 7. Even under a machine delivering 4,000 pounds of compaction force, granite does not crush easily. It relies on mechanical interlock rather than any chemical bonding, and it does not react when wet.
For a driveway 15 meters long, 3.5 meters wide, and 150 mm thick, multiply length by width by depth and the required volume comes out to about 7.87 cubic meters.
The quarry sells by weight. One cubic meter of this mixed material weighs about 1.8 tons. To fill 7.87 cubic meters, you need to pay for roughly 14.1 tons.
Buying in rainy weather is a bad deal. Outdoor stockpiles can absorb water and push moisture content up to 12%. If you pay for 14 tons, nearly 1.6 tons of that could just be rainwater.
Wet stone also sticks inside the truck bed, and even with the dump body raised to 45 degrees it does not empty cleanly. Pick up the material after several dry days in a row. At 3% to 5% moisture content, the fines stay coated onto the coarse stone instead of caking in the truck.
When the driver hands over the ticket, check the details carefully:
- Net weight on the scale ticket
- Mix designation listed as 304 Base
- Axle spacing of the delivery truck
- Confirmed plant moisture content below 5%
When the truck arrives, the bed lifts to about 30 degrees and the dry stone should slide cleanly out through the tailgate.
In cold climates, frost can penetrate as deep as 80 cm. Ice expansion can exert about 15 kg of force per square centimeter. If the mix contains too much stone dust, trapped water cannot drain out.
When temperatures drop below freezing, water expands by 9%. In spring thaw, the driveway can heave upward by 3 to 5 cm. In cold regions, fines content should be limited to no more than 15%.
In tropical areas with frequent downpours of 50 mm per hour, runoff can be strong enough to wash out fines. Crushed limestone is a better choice there, because once it binds, heavy water flow is less likely to erode it apart.
Crushed recycled concrete from demolished buildings is much cheaper. After screening, it usually leaves behind chunks around 50 mm in size. It can cost 20% to 40% less per ton than newly quarried stone.
But if you buy recycled material, inspect it carefully:
- Pieces with exposed rebar should be under 2 cm
- Black asphalt fragments should be less than 2%
- There should be no broken brick or moldy wood debris mixed in
Dumping the Base Stone
A fully loaded tri-axle truck pulls onto the site carrying a gross weight of 30 tons. Its 10 heavy rubber tires put enormous pressure on the ground. The installed 8-ounce nonwoven fabric is delicate by comparison. If the truck turns its steering wheel even halfway while on the black fabric, it can rip a 50 cm tear on the spot.
Have the driver stop the truck on the old asphalt at the outer edge. The 6-meter metal dump body rises slowly on three large hydraulic cylinders. A fully raised bed needs major overhead clearance. Look up carefully and clear anything in the way.
Watch out for the following overhead hazards:
- Low service wires hanging under 7 meters
- Large oak branches reaching across the work zone
- A black fiber-optic cable crossing overhead
- The metal arm of a streetlight extending outward
Experienced drivers often hang two heavy chains at the tailgate so the truck can spread stone while creeping forward. But when fabric is already laid, the tires cannot drive onto it at all. The full 14-ton load must be dumped outside the start of the fabric on the exposed muddy area, forming a pile over 2 meters high.
Next to it sits a skid steer rented for $300 a day. The machine weighs nearly 3 tons and carries a 60-inch flat bucket. Pull the control levers and keep both rubber tracks moving only over already placed stone. There must always be at least 100 mm of stone under the tracks.
Drive the bucket low into the bottom of the pile and scoop up half a ton of loose material in one pass. Pull back on the controls and raise the bucket 60 cm off the ground. Move to the leading edge of the work and slowly dump the load onto the clean exposed fabric ahead. Reverse, lower the bucket, and drag the stone back to level it.
Parking areas wider than 4 meters may require more than one roll of fabric. Leave 30 to 45 cm of overlap where two sheets meet. As the skid steer pushes stone forward, it must always move in the direction that presses the top sheet down. If you push against the overlap, sharp stone can wedge between the two layers and pull muddy subgrade up through the seam.
The machine must avoid the following actions:
- Pivoting in place on a layer thinner than 5 cm
- Letting the bucket teeth scrape and tear the black fabric underneath
- Slamming on the brakes while carrying half a ton downhill
- Breaking the taut red layout string with the heavy tracks
In a narrow courtyard enclosed by solid brick walls on three sides, machinery may not fit at all, leaving only hand labor. A heavy steel wheelbarrow with a 6-cubic-foot capacity weighs around 220 kg when fully loaded. Its single pneumatic tire sinks badly into soft yellow mud. Pushing that load even three steps is exhausting.
Buy several sheets of 19 mm exterior plywood. Lay the 1.2-meter-wide sheets end to end along the haul path. The wheelbarrow will roll much more easily over flat, solid plywood. After unloading one load, pick up the rear sheet and move it to the front, like laying portable track.
The dumped stockpile at the entrance will almost always segregate badly. The 64 mm coarse stone rolls all the way to the base of the pile. Flour-like fines and 5 mm chips stay at the top. If you fill with only the coarse outer ring, compaction will leave large voids underneath.
Use a few basic methods to remix the pile:
- Shovel the larger outer stones back into the finer center material
- Scoop each bucket load from the very bottom upward
- Use a 14-tine field rake to stir and blend the stone on the ground
- If you see a spot made up mostly of fines, throw in two shovel loads of larger stone
After pushing forward about 3 meters, stop the machine and check thickness. Push a tape measure down into the stone until the metal hook touches the soft fabric. A reading around 150 mm is acceptable. The wooden side forms installed along the driveway edges should already have a red grade mark drawn on them.
Take a straight 2×4 and drag it laterally with both ends riding on the side forms. If it hangs up, shovel off any stone that stands more than 3 cm too high. If you can see daylight under the board, throw in two shovels of fine-rich material. After screeding, the surface should still hold a 3% slope so rainwater drains cleanly away.
Uniform Spreading
Once the 3-ton machine backs out, its tracks leave muddy grooves about 5 cm deep. Large untouched areas still expose the black weed barrier at the edges. The remaining rough work has to be done by hand. Buy a 36-inch-wide aluminum landscape rake from the hardware store—do not try to use a lightweight plastic leaf rake on heavy stone.
This style of aluminum rake weighs less than 2 kg and has more than 30 flat steel teeth about 6 cm long. Grip the 1.8-meter wooden handle with both hands and pull stone from high spots that sit 4 cm above the red reference line down into low areas. Lean your body backward and let your weight do the work. Trying to push directly into a half-ton pile is a good way to strain your arms.
Spreading stone is not about picking out the large rocks and throwing them away. The powdery fines must settle into the gaps, and the 50 mm stone must lock together. That is how the surface compacts into something as hard as a steel plate.
The thickness is controlled by a bright orange nylon string stretched in the air. Tie it to stakes at both ends of the driveway and hang a small plastic line level on it. Once the bubble centers, measure the vertical distance down to the surface. It must be exactly 150 mm.
- Drive a 40 cm pointed pine stake deep into the ground every 3 meters
- The orange nylon line should be tight enough to give a faint hum when plucked
- Use a 150 mm wood gauge stick vertically from the line to the stone
- If the stick hangs in midair over a depression, add two or three shovel loads immediately
- If a hump sticks above the gauge, rake across it several times until it is cut down
The driveway should have a gentle crown, high in the center and lower at both edges. On a standard 3.5-meter single-lane driveway, the centerline should be 5 cm higher than the edges. Use a straight 10-foot 2×4 and mark a red cross at the midpoint to line it up with the driveway centerline.
Have two people hold the board, one at each end, and slowly pull it backward while keeping it on the surface. Excess stone will gather into a low ridge about 5 cm high. Then switch to a short 14-tine steel rake and break up that ridge to fill any shallow depressions less than 2 cm deep.
Areas that look flat often hide low spots. If a 10 mm rain leaves a puddle there, the stone layer in that spot is too thin.
Repeated raking can cause the large stone and the flour-like fines to separate. The 60 mm stones rise to the top while the fines fall through. If you see a patch larger than 0.5 square meter made up only of coarse rock, shovel on fresh mixed material with about 30% stone dust and blend it back in.
- Keep the rake teeth working no deeper than 10 cm
- If you find a soft pocket full of fines, throw in a generous handful of 40 mm hard stone
- Lay the shovel flat and slap the surface to vibrate loose dust downward
- If you find a rotten weak rock the size of a watermelon, toss it out by hand
Loose stone that has not yet been compacted can contain 30% air by volume. A tape may show a full 150 mm thickness, but once a heavy roller runs over it, it can settle immediately to 100 mm. Leave 50 mm of extra height for compaction so the finished surface does not end up below the road edge.
The 1-meter strip along the old asphalt edge is the area most likely to be gouged by tires. A 2-ton SUV repeatedly starting and turning there applies major stress. Quietly increase the stone thickness in that 1-square-meter zone to 180 mm. That extra 30 mm can withstand roughly 2,000 more aggressive tire starts.
Where the new stone meets an old concrete wall, leave a 1 cm gap. Cut strips of 10 mm asphalt board and place them between the old concrete and the new stone. In extreme cold, when the frozen soil heaves upward, the two surfaces can move independently without binding.
Hand-spreading stone is brutal on your hands. Buy canvas gloves with thick rubberized palms. They will keep rough wooden handles from rubbing huge blisters into your skin.
After finishing a short section, step back 5 meters and squint across the surface from a low angle. The best time to spot flaws is in low-angle sunlight at 8 a.m. or 5 p.m. Even a shallow dip just 2 cm deep will cast a large gray shadow. Walk over with a shovel and add two scoops of fine-rich mix to the dark area.
On curved sections, the inside edge should sit 3 cm lower than the outside edge. At 20 km/h, a car turning through the curve benefits from that slope because it helps resist outward tire force. Use a tape measure several times along a 3-meter bend radius and push the excess material toward the higher outer edge.
Compact the Base Layer
Compaction in Lifts
The dump truck unloads 12 cubic yards of 3/4-inch crushed stone mixed with gray-white stone dust. Workers use a small loader to spread the pile. Above the plastic fabric, the loose stone layer is only 2.5 inches thick.
A 36-inch aluminum landscape rake is used to smooth it out. A standard 2×4 lies on the ground as a visual gauge. The board is actually 1.5 inches thick, and the loose stone sits about 1 inch above the top of it.
- Keep each lift to no more than 2.5 inches thick
- Hand-pick and remove any stone larger than 2 inches in diameter
- Maintain a roughly 3:7 ratio of stone dust to crushed stone
- Leave 1 inch of settlement allowance at the edges
Pull the starter cord and fire up the 200-pound gas-powered plate compactor. Its 20×24-inch steel plate vibrates hard. The machine strikes the ground 4,000 times per minute and creeps forward at about 50 feet per minute.
Air is forced out from between the stones. The loose 2.5-inch layer visibly settles. A steel tape shows the compacted thickness now measures 2 inches. The total volume has been forced down by 20%.
Set the hose nozzle to a fine mist and spray the surface. Water penetrates less than 0.5 inch into the stone. About 2 gallons of tap water is used per 100 square feet. Once damp, the dry stone dust darkens and feels tacky.
The loader then brings in the next batch of stone. Its heavy rubber tires roll across the newly compacted layer. This base can now carry 5,000 pounds without leaving a single rut in the soil below.
Use the same rake to spread the second lift to 2.5 inches thick. With a square shovel, dig about 1 inch down at the interface between the old layer and the new one. The top of the old stone and the bottom of the new stone should blend together and interlock.
- Keep the contact surface rough and irregular between lifts
- Maintain the moisture content of fresh stone at about 4%
- Reduce loader dump height to less than 3 feet
- If wind reaches 15 mph, double the water application
Run the compactor over the second lift. The steel plate sends 4,500 pounds of force through the fresh stone, and the vibration wave penetrates into the older layer below. Together the two layers, now 4 inches thick, compact into one dense slab.
Stretch bright nylon string along both sides of the driveway. Tie it to stakes driven every 10 feet. Measure vertically from the string to the surface. The grade tolerance must stay within 1/4 inch.
The third lift is where the drainage slope is formed. The center of the driveway must end up exactly 2 inches higher than both edges. Measured with a level, the surface should drop 1/4 inch for every foot from the center outward. In rain, water will run off into the grass on both sides.
The operator adjusts the rake angle. The center of the driveway gets 3 inches of loose stone, while the edges get only 2 inches. The compactor path is changed as well.
The machine starts from the lowest edge. The steel base plate tilts 2 degrees to match the slope. With each pass, it shifts 8 inches closer toward the center. The strong vibration allows a small amount of stone to slide gently downslope into place.
After all three lifts are compacted, the total thickness reaches 6 inches. The void ratio drops below 5%. An 8,000-pound Ford pickup is then driven onto the pad. Under all four tires, the surface deflects less than 1/16 inch.
- Drive the pickup back and forth with the bed fully loaded
- Strike the surface with a cast-iron pick and listen for a sharp ring
- Dig a 2-inch-deep inspection hole with a steel rod
- Set 6×6 treated timbers along the edges to keep the stone contained
Moisture Conditioning
The freshly dumped 3/4-inch graded aggregate is bone dry. On an 85°F sunny day, the loader tracks kick up white dust half a meter high. Dry stone will not lock together properly. If you run a 200-pound compactor over it, the machine can literally bounce 1 inch off the surface.
Compacting it dry is a waste of time. Bring in water. Pull out the 5/8-inch black hose from the yard and screw on a solid brass nozzle. Set it to Mist, hold it about 3 feet above the ground, angle it down at 45 degrees, and spray the 2.5-inch-thick loose stone back and forth.
Controlling the water is a skill. Once you apply 3 to 4 gallons per 100 square feet, stop. As 50°F tap water hits the hot stone, a faint white vapor rises. Once the stone drinks in the moisture, it becomes much easier to work with.
- The pale gray stone slowly darkens to deep gray
- The fines cling to the stone instead of blowing around
- Rubber boots feel slightly tacky walking over it
- A handful leaves a few muddy specks in your palm
Do not rush the compactor onto the surface right away. Let gravity pull the water downward. Wait about 10 minutes, then push a 6-inch steel spike straight into the stone and pull it out. If the wet mark on the spike reaches about 1.5 inches deep, the moisture is right.
The particles smaller than 1/8 inch absorb water and swell slightly, acting like a natural binder. But if you open the hose full blast and dump 10 gallons per 100 square feet, the whole thing turns into a mud-and-stone slurry.
If the compactor runs into standing water, the job is ruined. The heavy base plate sinks 1.5 inches into the wet pocket, and yellow muddy water starts spurting out from underneath like a fountain. Instead of forming a hard slab, the base becomes a soft sponge.
- Above 90°F, reapply water every 20 minutes
- When humidity reaches 80% on an overcast day, cut water in half
- If you see reflective puddles, shut the hose off immediately
- On hot sunny days, pre-wet the layer underneath before placing new stone
Dry corners and edges along walls need separate treatment. Use a plastic watering can holding 2 gallons and fit it with a fine rose head. Make two passes along the driveway edge. About half a gallon is enough.
Experienced foremen check moisture by hand. Scoop up about 2 ounces of stone mixed with fines and squeeze it in your palm for 3 seconds. When you open your hand, the material should just hold together as a loose ball.
Your palm should feel cool and damp, but no water should squeeze out between your fingers. Touch the ball lightly with one finger and it should immediately crumble back apart. That means the moisture content is right in the 4% to 6% range.
- Keep two graduated 5-gallon buckets nearby to monitor water volume
- Install a timer valve at the hose connection to prevent accidental overwatering
- Keep a 24-inch push broom ready to sweep away pooled water
- Wear thick-soled slip-resistant rubber work boots and walk the surface to check it
When properly moistened aggregate meets a plate compactor hitting at 4,000 blows per minute, the effect is immediate. Water lubricates the rough stone surfaces so the pieces can slide, settle, and interlock tightly. The layer shrinks by about 1/4 inch, and even a 2-pound boot leaves no visible print.
You can hear the difference too. Dry stone sounds loose and rattly under the plate. With the right moisture, the sound turns into a crisp, tight slap. More of the energy is absorbed by the ground, and far less vibration travels into your hands.
Compaction Pattern
A single-lane driveway 50 feet long and 12 feet wide is covered with freshly moistened crushed stone. The 200-pound plate compactor sits at the edge on bare soil with a full tank of gas. If you wander around randomly on loose stone, the material will simply push sideways into the grass. Experienced operators always start at the far right edge of the driveway.
The 20×24-inch steel plate should ride right along the boundary between grass and stone. Pull the starter cord hard and the machine will begin creeping forward at about 45 feet per minute. The stone at the edge takes the first heavy hits. After two passes, both edges become dense, acting like sidewalls that keep the inner material confined.
“If the edge stone is not locked in first, the loose material in the middle will keep escaping outward. In a few months, the whole base starts coming apart.”
- Reduce speed to about 30 feet per minute for the first two passes along the grass edge
- The outside edge of the steel plate should just cover the nylon layout line
- On a curve, keep each steering correction under 15 degrees
- For the dead corner within 2 inches of treated timber edging, use an 8-pound hand tamper
Moving too fast is one of the most common mistakes. A normal adult walking pace is around 3 feet per second, far too fast for the plate to compact a thick stone layer properly. Force yourself to slow way down. The machine should advance at under 1 foot per second.
At the end of the 50-foot driveway, turn for the next pass. Never wrench the machine around in place. A plate hitting 4,000 times a minute can dig a 3-inch crater if it spins on one spot. Lift slightly on the handle, let the front lighten, and arc it around in a 3-foot-radius turn.
The return path should overlap the previous pass. The left half of the plate should cover the right half of the previous track. With a 24-inch-wide plate, each new pass should shift only 12 inches toward the center. A 50% overlap gives even compaction across the entire width.
“If the plate paths are too far apart, you leave a half-inch strip of loose material in between. One heavy truck tire and that strip will crack open.”
After compacting two passes along the far right side, move to the far left edge and repeat the process. Each side forms a 24-inch-wide compacted safety band. From there, the pattern closes inward like a zipper. With nowhere to escape, the loose center stone is forced downward under pressure.
- Leave a 16-inch raised strip down the center for the final finishing passes
- Keep lateral deviation on each straight pass within 2 inches
- If you find a depression deeper than 3 inches, stop and add fresh material
- Areas already touched by the plate appear darker gray in sunlight
After two passes north-south, the stone shows long parallel dark bands. But one directional pass is not enough; air still remains trapped lower in the layer. Stop the machine, rotate the work direction 90 degrees, and start again across the 12-foot width of the driveway.
Because the width is only 12 feet, each cross pass takes about 8 seconds. Keep moving side to side in short runs. Maintain the same 12-inch overlap. Two passes north-south and two passes east-west leave a cross-hatched pattern on the surface like a checkerboard.
On sections with a natural 0.2% drainage slope, never run the machine sideways across the incline. If the plate tilts, compaction becomes uneven. On sloped areas, move straight up and down the slope. Gravity combines with the downward force of the machine, pressing the stone into a solid slab.
“Run straight up and down the slope so the plate force always drives vertically into the surface. That is how you get a smooth, fully supported base.”
Once the full crosshatch pattern is complete, the machine will have run for about 90 minutes. The half-gallon tank of 87-octane gas is nearly empty. Lie down and check flatness with a 48-inch aluminum level. Not even a 0.06-inch coin should fit under the straightedge.
- The outside stone edge should sit exactly 1/4 inch below the adjacent soil
- Dropping a solid concrete brick on the surface should produce no hollow thud
- Your boot sole should make a harsh dry scraping sound when rubbed across the stone
- What swallowed your ankle the day before should now feel like a hard crusted road base
Apply the Top Surface Layer
Choose the Right Material
At the quarry, ask specifically for Crusher Run, Item 4, or Dense Graded Base. This material contains 19 mm angular crushed stone mixed with flour-like fines. Large suppliers following ASTM D2940 will typically provide a gradation where 8% to 15% passes the No. 200 sieve.
If the fines content is below 8%, tires will slip easily. If it is above 15%, the surface turns to mud when wet and cracks when it dries. Grab a handful on site and squeeze it hard. A proper mix will hold a loose clump in your hand and leave a light gray-white dust film on your palm.
Cheap limestone usually costs $25 to $35 per ton. Its Mohs hardness is only 3 to 4, so under constant pickup traffic the stone surface wears smooth quickly. In dry weather, the driveway turns dusty white; in rain, tires track the slurry into the garage.
Granite or Trap Rock lasts much longer. These materials have a Mohs hardness of 6 to 7 and typically cost $45 to $60 per ton. Their high hardness creates sharp broken faces that lock tightly together, and even an 8,000-pound single axle from a commercial vehicle will not deform them easily.
Some quarries push cheap RCA, or recycled concrete aggregate, for as little as $15 to $20 per ton. It often contains rusted steel wire and fingernail-size glass fragments from demolition debris, which can puncture tires easily. Its highly alkaline residue can leach into the soil in rain and kill lawn roots within 3 meters.
Check the quarry’s sieve report and verify the actual percentages passing each screen size:
- 1-inch screen: 100% passing
- 3/4-inch screen: 90% to 100% passing
- No. 4 sieve (4.75 mm): 40% to 65% passing
- No. 200 sieve (0.075 mm): 8% to 15% passing
One loose cubic yard of crushed stone weighs about 1.3 to 1.4 tons. Freshly delivered material contains a lot of air, and its volume drops significantly after compaction. Dense graded aggregate usually shrinks by 20% to 30%. If you want a final 2-inch surface, order enough loose material for 2.5 to 2.6 inches.
A driveway 60 feet long by 10 feet wide covers 600 square feet. At a compacted thickness of 2 inches, that requires 3.7 cubic yards. Add 25% for compaction loss, and the actual order should be 4.6 cubic yards. By weight, that comes to about 6.5 tons.
Once the truck brings 6.5 tons to your driveway, the way it dumps the load will make a huge difference in how much labor comes later.
- Ask the driver to tailgate spread the load
- Have the truck back up at 3 to 5 mph
- Keep the dump angle under 30 degrees
- Never let it dump into a pyramid-shaped pile
If the truck dumps the load into a mound and you need a skid steer to flatten it, that will cost another $250 to $300 a day. One adult with a shovel takes about 45 minutes of hard labor to spread 1 ton of gravel. A tailgate spread can cover 40 feet of driveway in 3 minutes and save an enormous amount of effort.
#57 Stone and washed gravel sold at landscape yards are pure 3/4-inch stone with no fines at all, leaving about 40% void space. Walking on it can twist an ankle, and turning a car on it throws stone like marbles into the grass. Cleaning that up later can take forever.
Crusher Run, once moistened and compacted, develops slight internal bonding from its calcium carbonate content and gradually hardens like a weak concrete slab.
When the load arrives, check its moisture by hand. If the stone is below 4% moisture, it will be extremely dusty, and you should add 2 to 3 gallons of water per ton so it compacts tightly. In temperatures above 85°F (29°C), 6 tons of material left in the sun for 2 hours can lose enough moisture that the top 2 inches drop below 1%. In hot weather, keep a 50-gallon water tank on hand and mist the surface continuously while placing it.
Spread It Evenly
The truck has left a long windrow of stone on the driveway, and now it is up to your tools to level it. Go to the hardware store and buy a wide Aluminum Landscape Rake. Leave the short plastic leaf rake in the shed.
Choose the model with a straight 36-inch aluminum head and a 6-foot magnesium-aluminum handle. The rake should weigh about 4 to 5 pounds and cost roughly $45 to $60.
The heavy flat aluminum head presses down into the stone and pulls smoothly without bouncing. Grip the end of the metal handle with both hands, lower it to about a 45-degree angle, and drag it back toward you.
Each pull will move about 2 cubic feet of mixed stone and fines. Never shove it forward like a snow pusher, because the front edge can easily cut into the geotextile fabric underneath.
Getting the stone truly flat depends on a set of simple but labor-intensive methods. Buy two rolls of yellow mason line rated for at least 150 pounds breaking strength.
Cut or buy 50 square pine stakes, each 1 inch in section, and drive them into the soil every 15 feet along both sides of the driveway. Each stake must be embedded at least 12 inches to stay rigid. If you kick one with your boot, it should not move.
Tie the yellow string tightly to the stakes at a height of 2.5 inches above the ground. Pull each line as tight as possible. When plucked, it should hum lightly, and mid-span sag must never exceed 1/4 inch.
Use the wide aluminum rake to move the stone until the surface just barely brushes the taut string. Once both sides are set to that height, the 2-inch-plus thickness is locked in.
A dead-flat surface would be a disaster. Rainwater would collect in the middle. Contractors call the correct shape, with the center high and both sides lower, Crowning.
The cross slope for drainage is set at 2%, which means the centerline must sit visibly higher than the edges. Use a straight 10-foot 2×4 and a 24-inch aluminum level with a bubble vial.
Lay the board across half the driveway, with one end resting on the center high point and the other end on the outer grade line. Place the level flat on the middle of the board and watch which way the bubble shifts.
| Total Driveway Width (ft) | Center Height Above Edge (in) | Single-Side Slope Length (ft) |
|---|---|---|
| 10 | 1.2 | 5 |
| 12 | 1.44 | 6 |
| 16 | 1.92 | 8 |
| 20 | 2.4 | 10 |
Use the rake to match the heights shown in the table. Flip the rake over and use the smooth back side to drag excess stone toward the middle with full force.
- Stand in the dirt outside the driveway and keep each pull under 3 feet
- If you find a depression below the string line, add half a shovel of fresh material
- If you hit a hard clump the size of a watermelon, strike it hard with the toothed side of the rake
- After each 10-foot section, step back 20 feet and check the surface reflection
Once the surface is flat, it still needs edge restraint. Without it, tires will push the small stone sideways into the lawn within weeks.
Go to the lumber yard and buy pressure-treated 4×4 timbers. Along the same line where the yellow string was stretched, dig a shallow trench 2 inches deep.
Set each 8-foot timber into the trench and drive a 12-inch hot-dip galvanized spike every 4 feet. These spikes are thicker than an adult finger and can resist thousands of pounds of side thrust from vehicle tires.
Use a 5-pound short-handled sledgehammer to drive the spikes completely through the timber and into the soil below. The finished stone surface should sit exactly flush with the top of the timber.
On curved sections, never try to force straight timbers to bend. Buy black high-density polyethylene (HDPE) rigid edging instead.
Choose the version that is 0.25 inch thick and comes with molded anchoring fins at the base. A 20-foot roll usually costs about $35. It follows curves extremely well.
- 8-foot pressure-treated 4×4 timbers rated for ground contact
- 12-inch long, 3/8-inch diameter hot-dip galvanized spikes
- 5-pound short-handled sledgehammer
- 0.25-inch black polyethylene edging
Compaction and Final Shaping
Drive your pickup to the equipment rental counter at the home center. Forget the idea of compacting this by brute force. A hand tamper with a 10×10-inch cast-iron plate is no match for a thick aggregate surface. Compacting just 100 square feet by hand will leave your arms aching for three days.
Rent a gas-powered Vibratory Plate Compactor. Choose a model with a 20-inch-wide base plate and an operating weight between 160 and 200 pounds.
It should be equipped with a Honda GX160 four-stroke engine capable of delivering 3,000 to 4,000 pounds of vertical force. In North America, daily rental runs about $80 to $110, usually with a full tank of unleaded fuel included.
A pickup bed sits more than 30 inches off the ground, so unloading a 200-pound machine has to be done carefully. Rent a pair of rubber-wheeled loading ramps rated for 1,000 pounds. Two adults should hold the steel handles and ease the machine slowly down the aluminum ramps without scraping or cracking the housing.
Leave the machine parked beside the stone for now. Pull over a 50-foot rubber hose and attach a nozzle with a metal shutoff valve. Set the brass tip to Shower.
- Apply 2 to 3 gallons of tap water per 10 square feet
- The water should bead on the stone surface, not run like a stream
- Shut the water off and wait 15 minutes in the shade
- Let the moisture fully soak into the 2-inch-thick fine-rich surface layer
Before starting, put on industrial hearing protection rated for 28 dB noise reduction. At full throttle, the machine exceeds 105 dB, and bare ears will start ringing within minutes. Wear suede leather work gloves to help control the violently vibrating handle.
Flip the red choke lever on the engine, then yank the starter rope hard. Once the gas engine catches, push the throttle all the way open. The 200-pound steel machine begins to jump violently on the gravel surface and creep forward with strong pushing force.
Stand on the adjacent soil and guide it along the pressure-treated 4×4 edge for the first pass. Keep the forward speed tightly controlled at just 1 foot per second. Go any faster and the plate will not drive through the top 2 to 3 inches of stone.
- Run one long straight pass along the edge, then turn and make a second pass back
- The second pass should overlap the first by one-third of the plate width
- Move inward inch by inch from the timber edge toward the centerline
- Never push the machine in circles over the gravel surface
When the machine reaches the driveway centerline, ease off the throttle and let it idle in place. Move to the opposite side and repeat the same pattern inward. The two sides should meet at the top of the crowned center ridge. Masons often call this edge-locking compression.
After the first full-coverage pass, the gravel surface will visibly settle by about half an inch. What was loose enough to leave footprints now becomes interlocked stone, with the flour-like fines forced by water and pressure deep into the voids.
The treated timber edging takes repeated 3,000-pound lateral blows from the compactor, and only those 12-inch spikes keep it from splitting or shifting. Open the throttle again and make two more full passes over the surface.